Upgrade your paint sprayer: The three most popular accessories
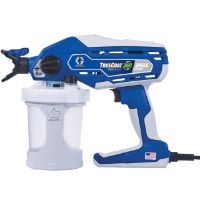
What a new set of bits is for your screwdriver. Or like buying a better battery for your handheld drill. New accessories create new possibilities for your paint sprayer. Enabling you to work faster or more comfortably. Getting bigger projects done or adding more precision. Here are the three accessories that are at the top of other do-it-yourselfers' wish lists.
1. An extra spray tip
Even though spray tips are only a small part of your entire set-up, they have a big impact on the quality of your project. They determine how wide you can spray and at what pressure. Some spray tips are designed for speed, others for the more detailed work.
A spray tip therefore also determines which type of projects you can take on.
By default, our DIY paint sprayers are equipped with an all-round spray tip. The team's midfielder, so to speak, who can stand his ground defensively and can also contribute to attacking plays. But who lacks the finishing power of a real striker or the positioning of a thoroughbred defender.
So if you have other types of work planned after your first project(s), it's a good idea to look at our complete range of spray tips.

For example: you bought a paint sprayer to paint the rooms of your house. Now you want to start bigger projects. With a lot of square metres. Then a spray tip with a wider spray pattern might be worth the investment.
Or maybe you are planning to paint your wooden stairs. Then the standard tip with a pattern of 25 centimetres is too wide. Then you are much better off with a tip that sprays 10 or 15 centimetres. A tip with a smaller orifice size is also specifically designed to spray wood paint - a different material than wall paint.
There are a total of 16 spray tips in our DIY range. Our Tip Selector guides you to the right one for your next project and your specific sprayer.
Which tip is right for you, depends on three factors:
- The material you want to spray
- How wide you want to spray
- Your sprayer
The Tip Selector shows you the way.
2. Extensions
An extension comes in handy when you want to spray ceilings. They also make it easier to complete larger projects faster, because an extension gives you extra reach.
But why do you need that extra reach?
For a good end result, you need to hold your spray gun 30 centimetres from the surface to be sprayed. No problem if you have long arms (or a low ceiling). But for high ceilings, this is a challenge.
Well, I’ll just use a ladder! But then you take away what spraying paint is all about: speed. If you paint with a brush and roller, your progress will be slower. In that situation, changing your ladder every few minutes is not that bad. But spraying paint makes you work faster, so moving your ladder every few seconds will not be ideal.
With an extension, you guarantee an ideal spray distance, without having to constantly move around your ladder.
Our extensions come in different lengths: 25, 40, 50 and 70 centimetres. But the principle is always the same: you screw your extension on top of your paint gun. And on the end of your extension, you then screw your paint tip and guard.
The 40-centimetre extension is by far the most popular and actually also the most ideal for ceilings.
3. The Pressure Roller
We finish up with the bronze medal: the Pressure Roller.
The classic way of doing things is with a brush and roller. If you switch to spraying, you have to give up your familiar way of working. And even though no one ever switches back once they try spray painting, that first project typically comes with a few questions. How exactly is this going to work? Am I doing it right?
That tinge of uncertainty probably explains the popularity of our Pressure Roller, a roller that you handle in the same way as a classic paint roller. And which also looks the same at first sight: a long handle with a paint roller at the end. Just like you are used to.
With one important difference: the Pressure roller combines spraying and re-rolling. So no more dipping into your paint tray, but simply pulling the trigger and spraying paint onto the roller.
| Classic paint roller | Graco Pressure Roller |
| Roller tray Capping and unrolling To refill, you have to stop painting Slow and clumsy | No roller tray needed Simply pull the trigger You refill while rolling Up to 4x faster |

Two birds with one stone: you also have an extension in one go, because the rod is an extension. And that extra reach is nice to have when you're painting ceilings.
Related Articles
Shutters
Explore our guide to using paint sprayers for shutters by Magnum by Graco. A new coat of stain or paint will help protect shutters from sun and weather.
Sheds
Learn how to spray paint sheds with sprayers by Magnum by Graco. Applying a new coat of paint or stain is easy with Magnum by Graco sprayers.
Railings
Discover Magnum by Graco's tips to paint banisters and stair railings using high quality paint sprayers. Protect your railings from sun and weather.
Do you have any product questions?
Register your unit
Register your product and receive a free bottle of Pump Armor, a storage fluid that extends the life of your pump.


